
Ansible is one of the most used tools for managing cloud and on-premises infrastructure. If you are looking for a flexible and powerful tool to automate your infrastructure management and configuration tasks Ansible is the way to go.
In this introductory guide, you will learn everything you need to get started with Ansible and start building robust automation solutions.
- What is Ansible?
- Basic Concepts & Terms
- How to Install Ansible
- Ansible Inventory
- Ansible ad hoc Commands
- Intro to Ansible Playbooks
- Ansible Roles
What is Ansible?
Ansible is a software tool that enables cross-platform automation and orchestration at scale and has become over the years the standard choice among enterprise automation solutions.
It’s mostly addressed to IT operators, administrators & decision-makers helping them to achieve operational excellence across their entire infrastructure ecosystem.
Backed by RedHat and a loyal open source community, it is considered an excellent option for configuration management, infrastructure provisioning, and application deployment use cases.
Its automation opportunities are endless across hybrid clouds, on-prem infrastructure, and IoT and it’s an engine that can greatly improve the efficiency and consistency of your IT environments.
Ready to automate everything? Let’s go!
How does Ansible work?
Ansible uses the concepts of control and managed nodes. It connects from the control node, any machine with Ansible installed, to the managed nodes sending commands and instructions to them.
The units of code that Ansible executes on the managed nodes are called modules. Each module is invoked by a task, and an ordered list of tasks together forms a playbook. Users write playbooks with tasks and modules to define the desired state of the system.
The managed machines are represented in a simplistic inventory file that groups all the nodes into different categories.
Ansible leverages a very simple language, YAML, to define playbooks in a human-readable data format that is really easy to understand from day one.
Even more, Ansible doesn’t require the installation of any extra agents on the managed nodes so it’s simple to start using it.
Typically, the only thing a user needs is a terminal to execute Ansible commands and a text editor to define the configuration files.
Benefits of using Ansible
A free and open-source community project with a huge audience. Battle-tested over many years as the preferred tool of IT wizards. Easy to start and use from day one, without the need for any special coding skills. Simple deployment workflow without any extra agents. Includes some sophisticated features around modularity and reusability that come in handy as users become more proficient. Extensive and comprehensive official documentation that is complemented by a plethora of online material produced by its community. To sum up, Ansible is simple yet powerful, agentless, community-powered, predictable, and secure.
Basic Concepts & Terms
Host: A remote machine managed by Ansible.
Group: Several hosts grouped together that share a common attribute.
Inventory: A collection of all the hosts and groups that Ansible manages. Could be a static file in the simple cases or we can pull the inventory from remote sources, such as cloud providers.
Modules: Units of code that Ansible sends to the remote nodes for execution.
Tasks: Units of action that combine a module and its arguments along with some other parameters.
Playbooks: An ordered list of tasks along with its necessary parameters that define a recipe to configure a system.
Roles: Redistributable units of organization that allow users to share automation code easier.
YAML: A popular and simple data format that is very clean and understandable by humans.
How to Install Ansible
To start using Ansible, you will need to install it on a control node, this could be your laptop for example. From this control node, Ansible will connect and manage other machines and orchestrate different tasks.
Installation Requirements
Your control node can be any machine with Python 3.8 or newer, but Windows is not supported.
For the managed nodes, Ansible needs to communicate with them over SSH and SFTP (this can also be switched to SCP via the ansible.cfg file) or WinRM for Windows hosts. The managed nodes also need Python 2 (version 2.6 or later) or Python (version 3.5 or later) and in the case of Windows nodes PowerShell 3.0 or later and at least .NET 4.0 installed.
The exact installation procedure depends on your machine and operating system but the most common way would be to use pip.
To install pip, in case it’s not already available on your system:
$ curl https://bootstrap.pypa.io/get-pip.py -o get-pip.py
$ python get-pip.py --user
After pip is installed:
$ python -m pip install --user ansible
Since there are different ways to install it for every operating system you can also have a look here to find the official suggested way for your environment. For example, check this guide for Ubuntu.
You can test on your terminal if it’s successfully installed by running:
$ ansible --version
Demo requirements
Now that we have Ansible installed, we are going to create our first demo setup. I am going to use my personal laptop as the control node and Vagrant along with VirtualBox to generate locally 2 Ubuntu machines that we will manage with Ansible.
If you wish to follow along, install Vagrant and VirtualBox. You can also find all the files that we are going to be using in this demo in this GitHub repository.
From the top of this GitHub repository execute:
vagrant up
This command will spin up 2 Ubuntu hosts in VirtualBox so that we can use them as our managed hosts in this demo exercise. You can also open VirtualBox to verify the existence of your 2 virtual machines.
Finally, to get the info necessary to build our hosts file run the vagrant ssh-config command:
$ vagrant ssh-config
Host host1
  HostName 127.0.0.1
  User vagrant
  Port 2222
  UserKnownHostsFile /dev/null
  StrictHostKeyChecking no
  PasswordAuthentication no
  IdentityFile /Users/ioannis/Desktop/blog/ansible_intro/.vagrant/machines/host1/virtualbox/private_key
  IdentitiesOnly yes
  LogLevel FATAL

Host host2
  HostName 127.0.0.1
  User vagrant
  Port 2200
  UserKnownHostsFile /dev/null
  StrictHostKeyChecking no
  PasswordAuthentication no
  IdentityFile /Users/ioannis/Desktop/blog/ansible_intro/.vagrant/machines/host2/virtualbox/private_key
  IdentitiesOnly yes
  LogLevel FATAL
Ansible Inventory
As previously mentioned, the inventory is the collection of the machines that we would like to manage. Usually, the default location for inventory is /etc/ansible/hosts but we can also define a custom one in any directory.
In the GitHub repository you will see a file named hosts that looks like this:
host1 ansible_host=127.0.0.1 ansible_user=vagrant ansible_port=2222 ansible_ssh_private_key_file=./.vagrant/machines/host1/virtualbox/private_key

host2 ansible_host=127.0.0.1 ansible_user=vagrant ansible_port=2200 ansible_ssh_private_key_file=./.vagrant/machines/host2/virtualbox/private_key
We used the information acquired by Vagrant to populate our hosts file. Currently, our hosts file contains only 2 entries for the hosts that we want to manage.
The host1 and host2 are the aliases we used to name them.
We specified some variables, such as the host, user, and SSH connection parameters necessary to connect to our managed nodes. Here’s a full list of inventory parameters that we can configure per host.
We will keep this inventory simple for the time being, but check out this guide to explore other inventory options such as creating host groups, adding ranges of hosts, and grouping variables.
For example, we can define groups of hosts like this:
[webservers]
webserver1.example.com
webserver2.example.com
webserver3.example.com
192.0.6.45

[databases]
database1.example.com
database2.example.com
In the above example, we defined two groups of hosts, webservers and databases.
Two special groups always exist by default; all that includes every host and ungrouped that includes all the hosts that aren’t in any groups.
Ansible ad hoc Commands
Using ad hoc commands is a quick way to run a single task on one or more managed nodes.
Some examples of valid use cases are rebooting servers, copying files, checking connection status, managing packages, gathering facts, etc.
The pattern for ad hoc commands looks like this:
$ ansible [host-pattern] -m [module] -a "[module options]"
host-pattern: the managed hosts to run against
-m: the module to run
-a: the list of arguments required by the module
This is a good opportunity to use our first Ansible ad hoc command and at the same time validate that our inventory is configured as expected. Let’s go ahead and execute a ping command against all our hosts:
$ ansible -i hosts all -m ping

host1 | SUCCESS => {
    "ansible_facts": {
        "discovered_interpreter_python": "/usr/bin/python"
    },
    "changed": false,
    "ping": "pong"
}

host2 | SUCCESS => {
    "ansible_facts": {
        "discovered_interpreter_python": "/usr/bin/python"
    },
    "changed": false,
    "ping": "pong"
}
Nice, seems like we can successfully ping the 2 hosts that we have defined in our hosts file.
Next, run a live command only to the host2 node by using the –limit flag
$ ansible all -i hosts --limit host2 -a "/bin/echo hello"

host2 | CHANGED | rc=0 >>
hello
Another example would be to copy a file to our remote nodes:
$ ansible all -i hosts -m ansible.builtin.copy -a "src=./hosts dest=/tmp/hosts"
host1 | CHANGED => {
    "ansible_facts": {
        "discovered_interpreter_python": "/usr/bin/python"
    },
    "changed": true,
    "checksum": "0bd8efb12ac716fdddf6dd8feedb750a7fc8c370",
    "dest": "/tmp/hosts",
    "gid": 1000,
    "group": "vagrant",
    "md5sum": "f425732ff83fe576b00f37dd63d94544",
    "mode": "0664",
    "owner": "vagrant",
    "size": 291,
    "src": "/home/vagrant/.ansible/tmp/ansible-tmp-1645033325.338188-14454-35489936437202/source",
    "state": "file",
    "uid": 1000
}
host2 | CHANGED => {
    "ansible_facts": {
        "discovered_interpreter_python": "/usr/bin/python"
    },
    "changed": true,
    "checksum": "0bd8efb12ac716fdddf6dd8feedb750a7fc8c370",
    "dest": "/tmp/hosts",
    "gid": 1000,
    "group": "vagrant",
    "md5sum": "f425732ff83fe576b00f37dd63d94544",
    "mode": "0664",
    "owner": "vagrant",
    "size": 291,
    "src": "/home/vagrant/.ansible/tmp/ansible-tmp-1645033325.356349-14456-242443746329447/source",
    "state": "file",
    "uid": 1000
}
Perfect, the files have been copied! We can verify this ourselves by “sshing” into one of the managed nodes:
$ vagrant ssh host1
vagrant@vagrant:~$ cat /tmp/hosts

host1 ansible_host=127.0.0.1 ansible_user=vagrant ansible_port=2222 ansible_ssh_private_key_file=./.vagrant/machines/host1/virtualbox/private_key
host2 ansible_host=127.0.0.1 ansible_user=vagrant ansible_port=2200 ansible_ssh_private_key_file=./.vagrant/machines/host2/virtualbox/private_key
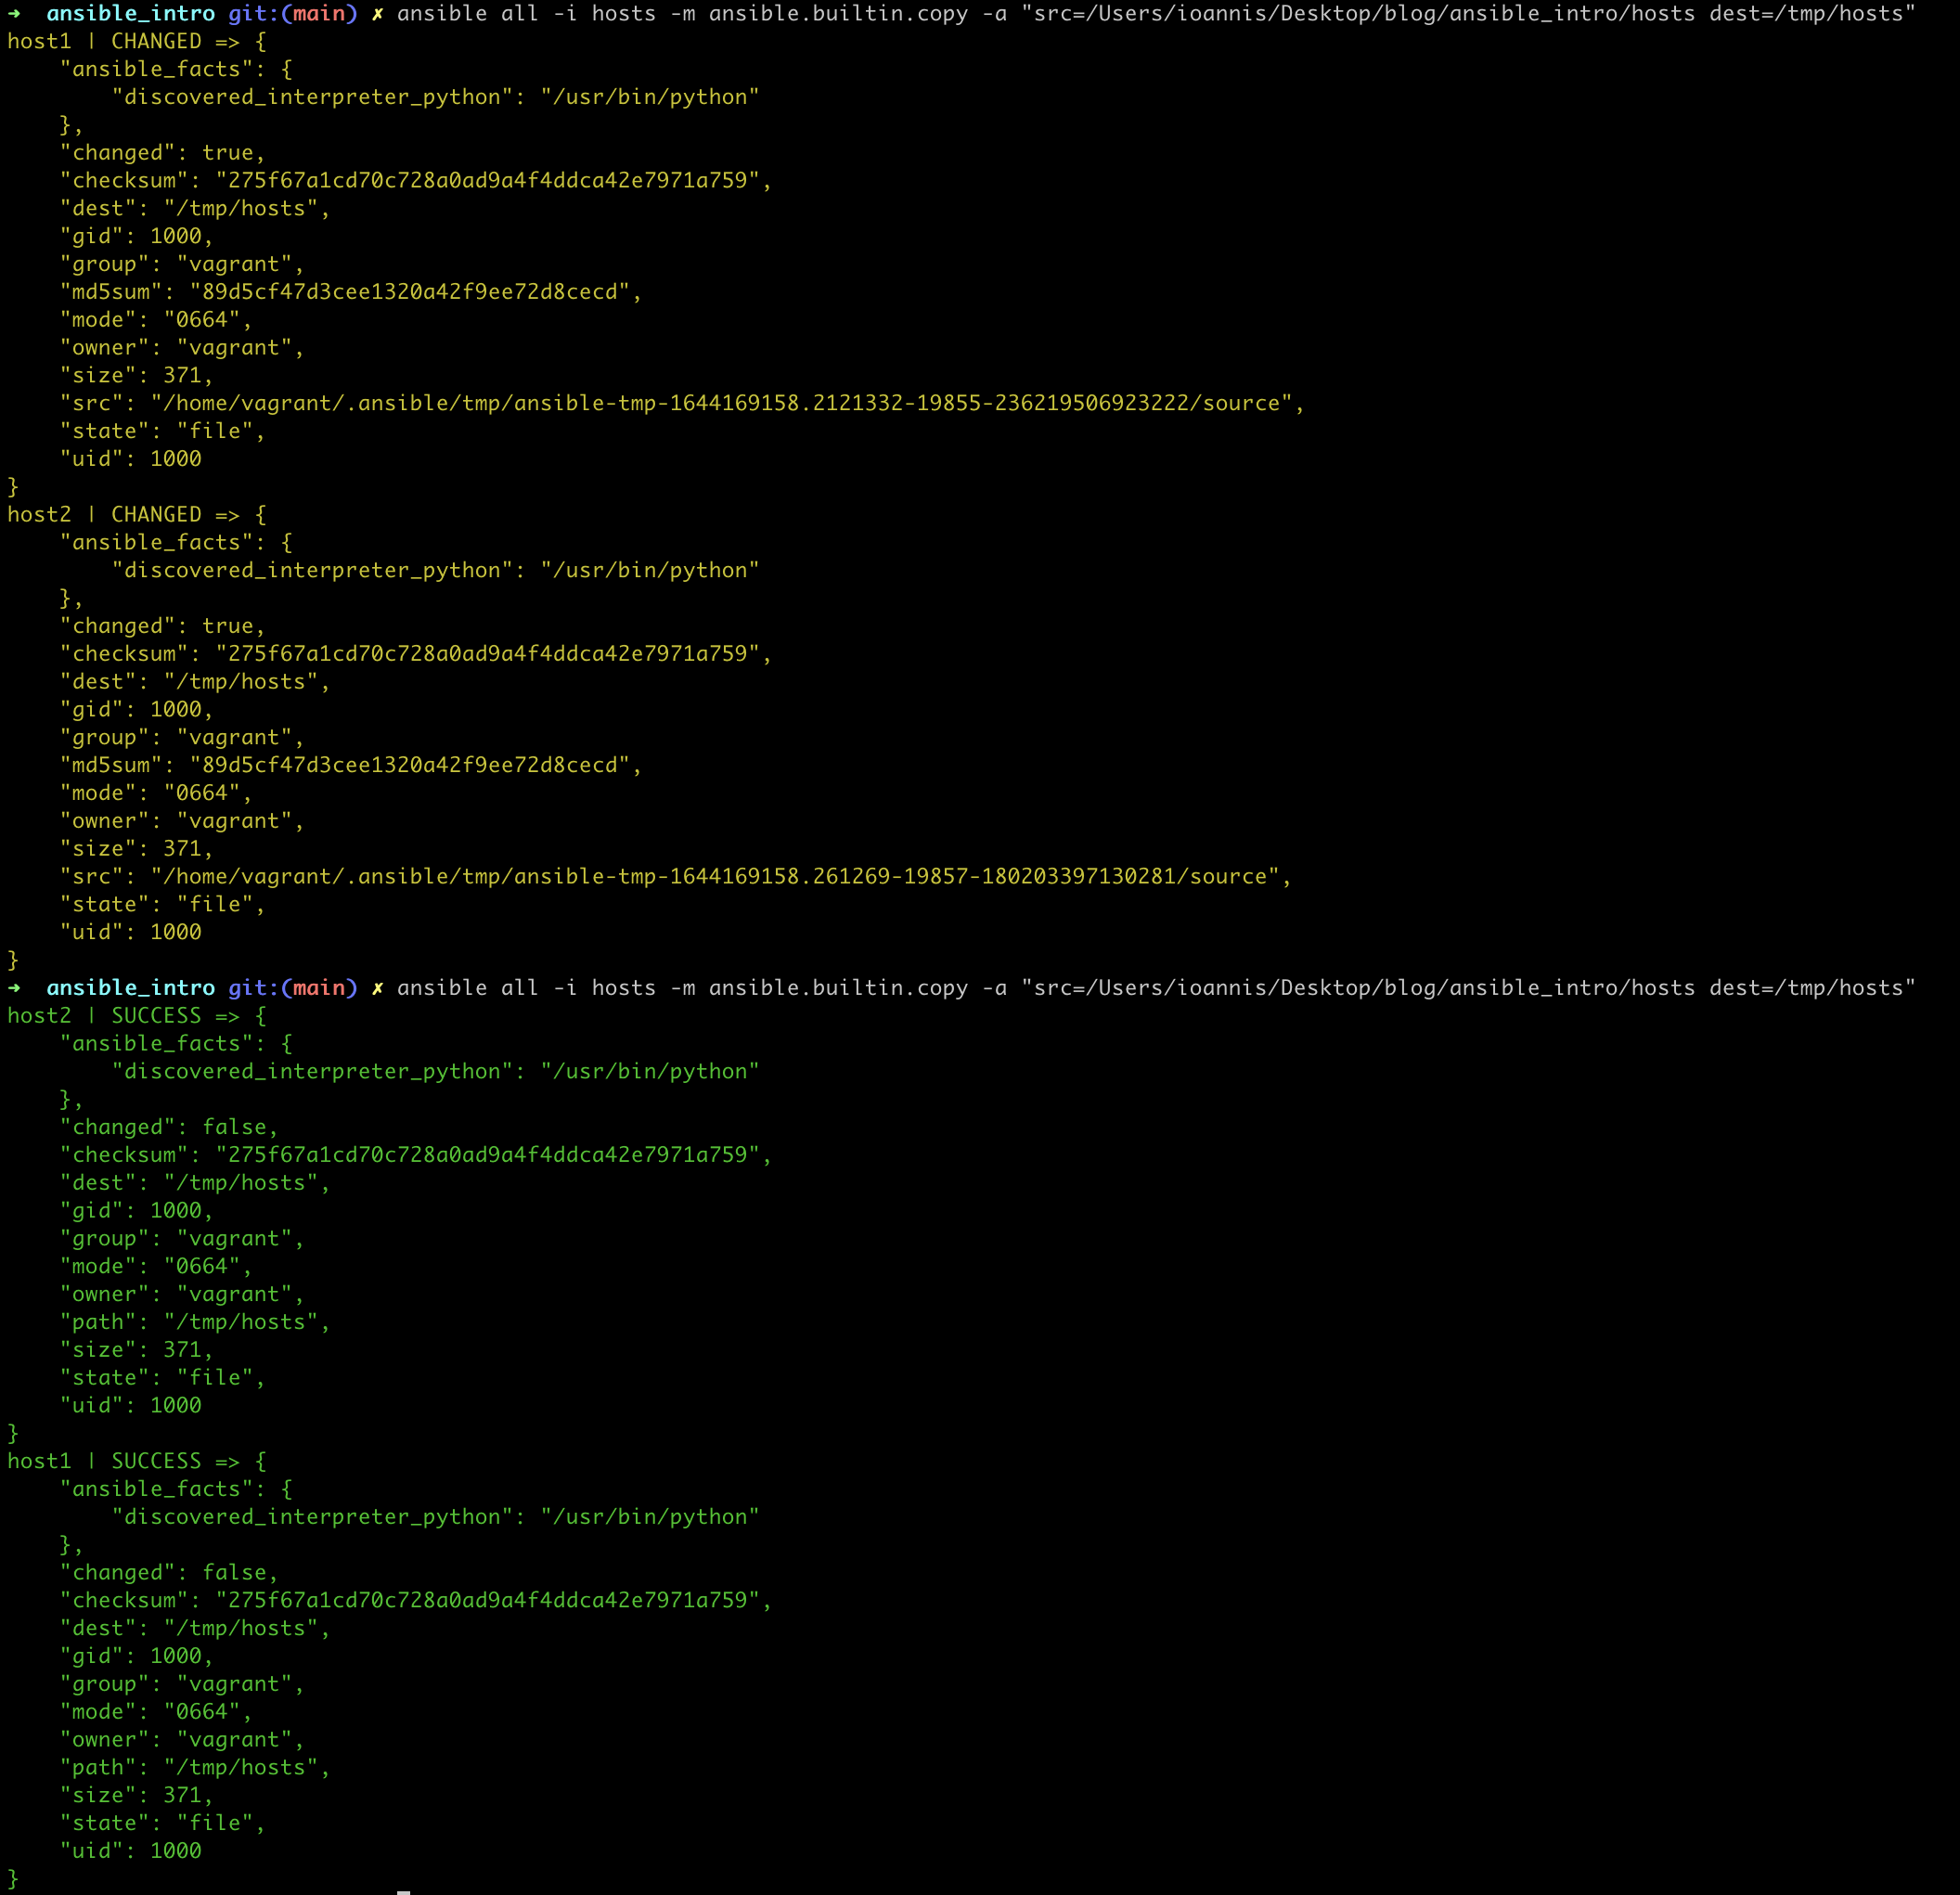
Most modules of Ansible are idempotent, which implies that the changes are applied only if needed.
If we try to run a command with an idempotent module, such as copy, we will see that the second time since the file already exists the tasks succeed without performing any actions.
Notice the different colors (green indicates no actions) of the command output after we execute the same command a second time:
If you would like to get more information about Ansible ad hoc commands, check out the Intro to ad hoc commands official user guide.
Intro to Ansible Playbooks
Playbooks are the simplest way in Ansible to automate repeating tasks in the form of reusable and consistent configuration files. Playbooks are scripts defined in YAML files and contain any ordered set of steps to be executed on our managed nodes.
As mentioned, tasks in a playbook are executed from top to bottom. At a minimum, a playbook should define the managed nodes to target and some tasks to run against them.
In playbooks, data elements at the same level must share the same indentation while items that are children of other items must be indented more than their parents.
Let’s look at a simple playbook to get an idea of how that looks in practice.
For the needs of this demo, we will use a simple playbook that runs against all hosts and copies a file, creates a user, and upgrades all apt packages on the remote machines.
---
- name: Intro to Ansible Playbooks
  hosts: all

  tasks:
  - name: Copy file hosts with permissions
    ansible.builtin.copy:
      src: ./hosts
      dest: /tmp/hosts_backup
      mode: '0644'
  - name: Add the user 'bob'
    ansible.builtin.user:
      name: bob
    become: yes
    become_method: sudo
  - name: Upgrade all apt packages
    apt:
      force_apt_get: yes
      upgrade: dist
    become: yes
On the top section, we define the group of hosts on which to run the playbook and its name. After that, we define a list of tasks. Each of the tasks contains some information about the task and the module to be executed along with the necessary arguments.
To avoid specifying the location of our inventory file every time we can define this via a configuration file (ansible.cfg). To find out more about Ansible configuration options check here.
[defaults]
inventory=./hosts
You can validate that this works as expected by running the ansible-inventory command.
ansible-inventory --list
{
    "_meta": {
        "hostvars": {
            "host1": {
                "ansible_host": "127.0.0.1",
                "ansible_port": 2222,
                "ansible_ssh_private_key_file": "./.vagrant/machines/host1/virtualbox/private_key",
                "ansible_user": "vagrant"
            },
            "host2": {
                "ansible_host": "127.0.0.1",
                "ansible_port": 2200,
                "ansible_ssh_private_key_file": "./.vagrant/machines/host2/virtualbox/private_key",
                "ansible_user": "vagrant"
            }
        }
    },
    "all": {
        "children": [
            "ungrouped"
        ]
    },
    "ungrouped": {
        "hosts": [
            "host1",
            "host2"
        ]
    }
}
Now we are ready to run our first playbook using the ansible-playbook command.
$ ansible-playbook intro_playbook.yml
 ___________________________________
< PLAY [Intro to Ansible Playbooks] >
 -----------------------------------
        \   ^__^
         \  (oo)\_______
            (__)\       )\/\
                ||----w |
                ||     ||

 ________________________
< TASK [Gathering Facts] >
 ------------------------
        \   ^__^
         \  (oo)\_______
            (__)\       )\/\
                ||----w |
                ||     ||

ok: [host2]
ok: [host1]
 _____________________________________________
< TASK [Copy file with owner and permissions] >
 ---------------------------------------------
        \   ^__^
         \  (oo)\_______
            (__)\       )\/\
                ||----w |
                ||     ||

changed: [host1]
changed: [host2]
 ___________________________
< TASK [Add the user 'bob'] >
 ---------------------------
        \   ^__^
         \  (oo)\_______
            (__)\       )\/\
                ||----w |
                ||     ||

changed: [host1]
changed: [host2]
 _________________________________
< TASK [Upgrade all apt packages] >
 ---------------------------------
        \   ^__^
         \  (oo)\_______
            (__)\       )\/\
                ||----w |
                ||     ||

[WARNING]: Updating cache and auto-installing missing dependency: python-apt
changed: [host2]
changed: [host1]
 ____________
< PLAY RECAP >
 ------------
        \   ^__^
         \  (oo)\_______
            (__)\       )\/\
                ||----w |
                ||     ||

host1                      : ok=4    changed=3    unreachable=0    failed=0    skipped=0    rescued=0    ignored=0
host2                      : ok=4    changed=3    unreachable=0    failed=0    skipped=0    rescued=0    ignored=0
Our playbook has been executed successfully and we can follow the ordered execution of the tasks per host by checking the command output. At the bottom, a summary of the playbook execution is provided by Ansible.
Something that you might find useful at times, is to validate the syntax of a playbook with the flag -–syntax-check.
Another handy option is to use the -C flag to perform a dry run of the playbook’s execution. This option doesn’t actually make any changes but it just reports the changes that will happen during a real run.
The official Working with playbooks user guide includes many more details and options about playbooks so make sure to read it when you start moving into more advanced use cases.
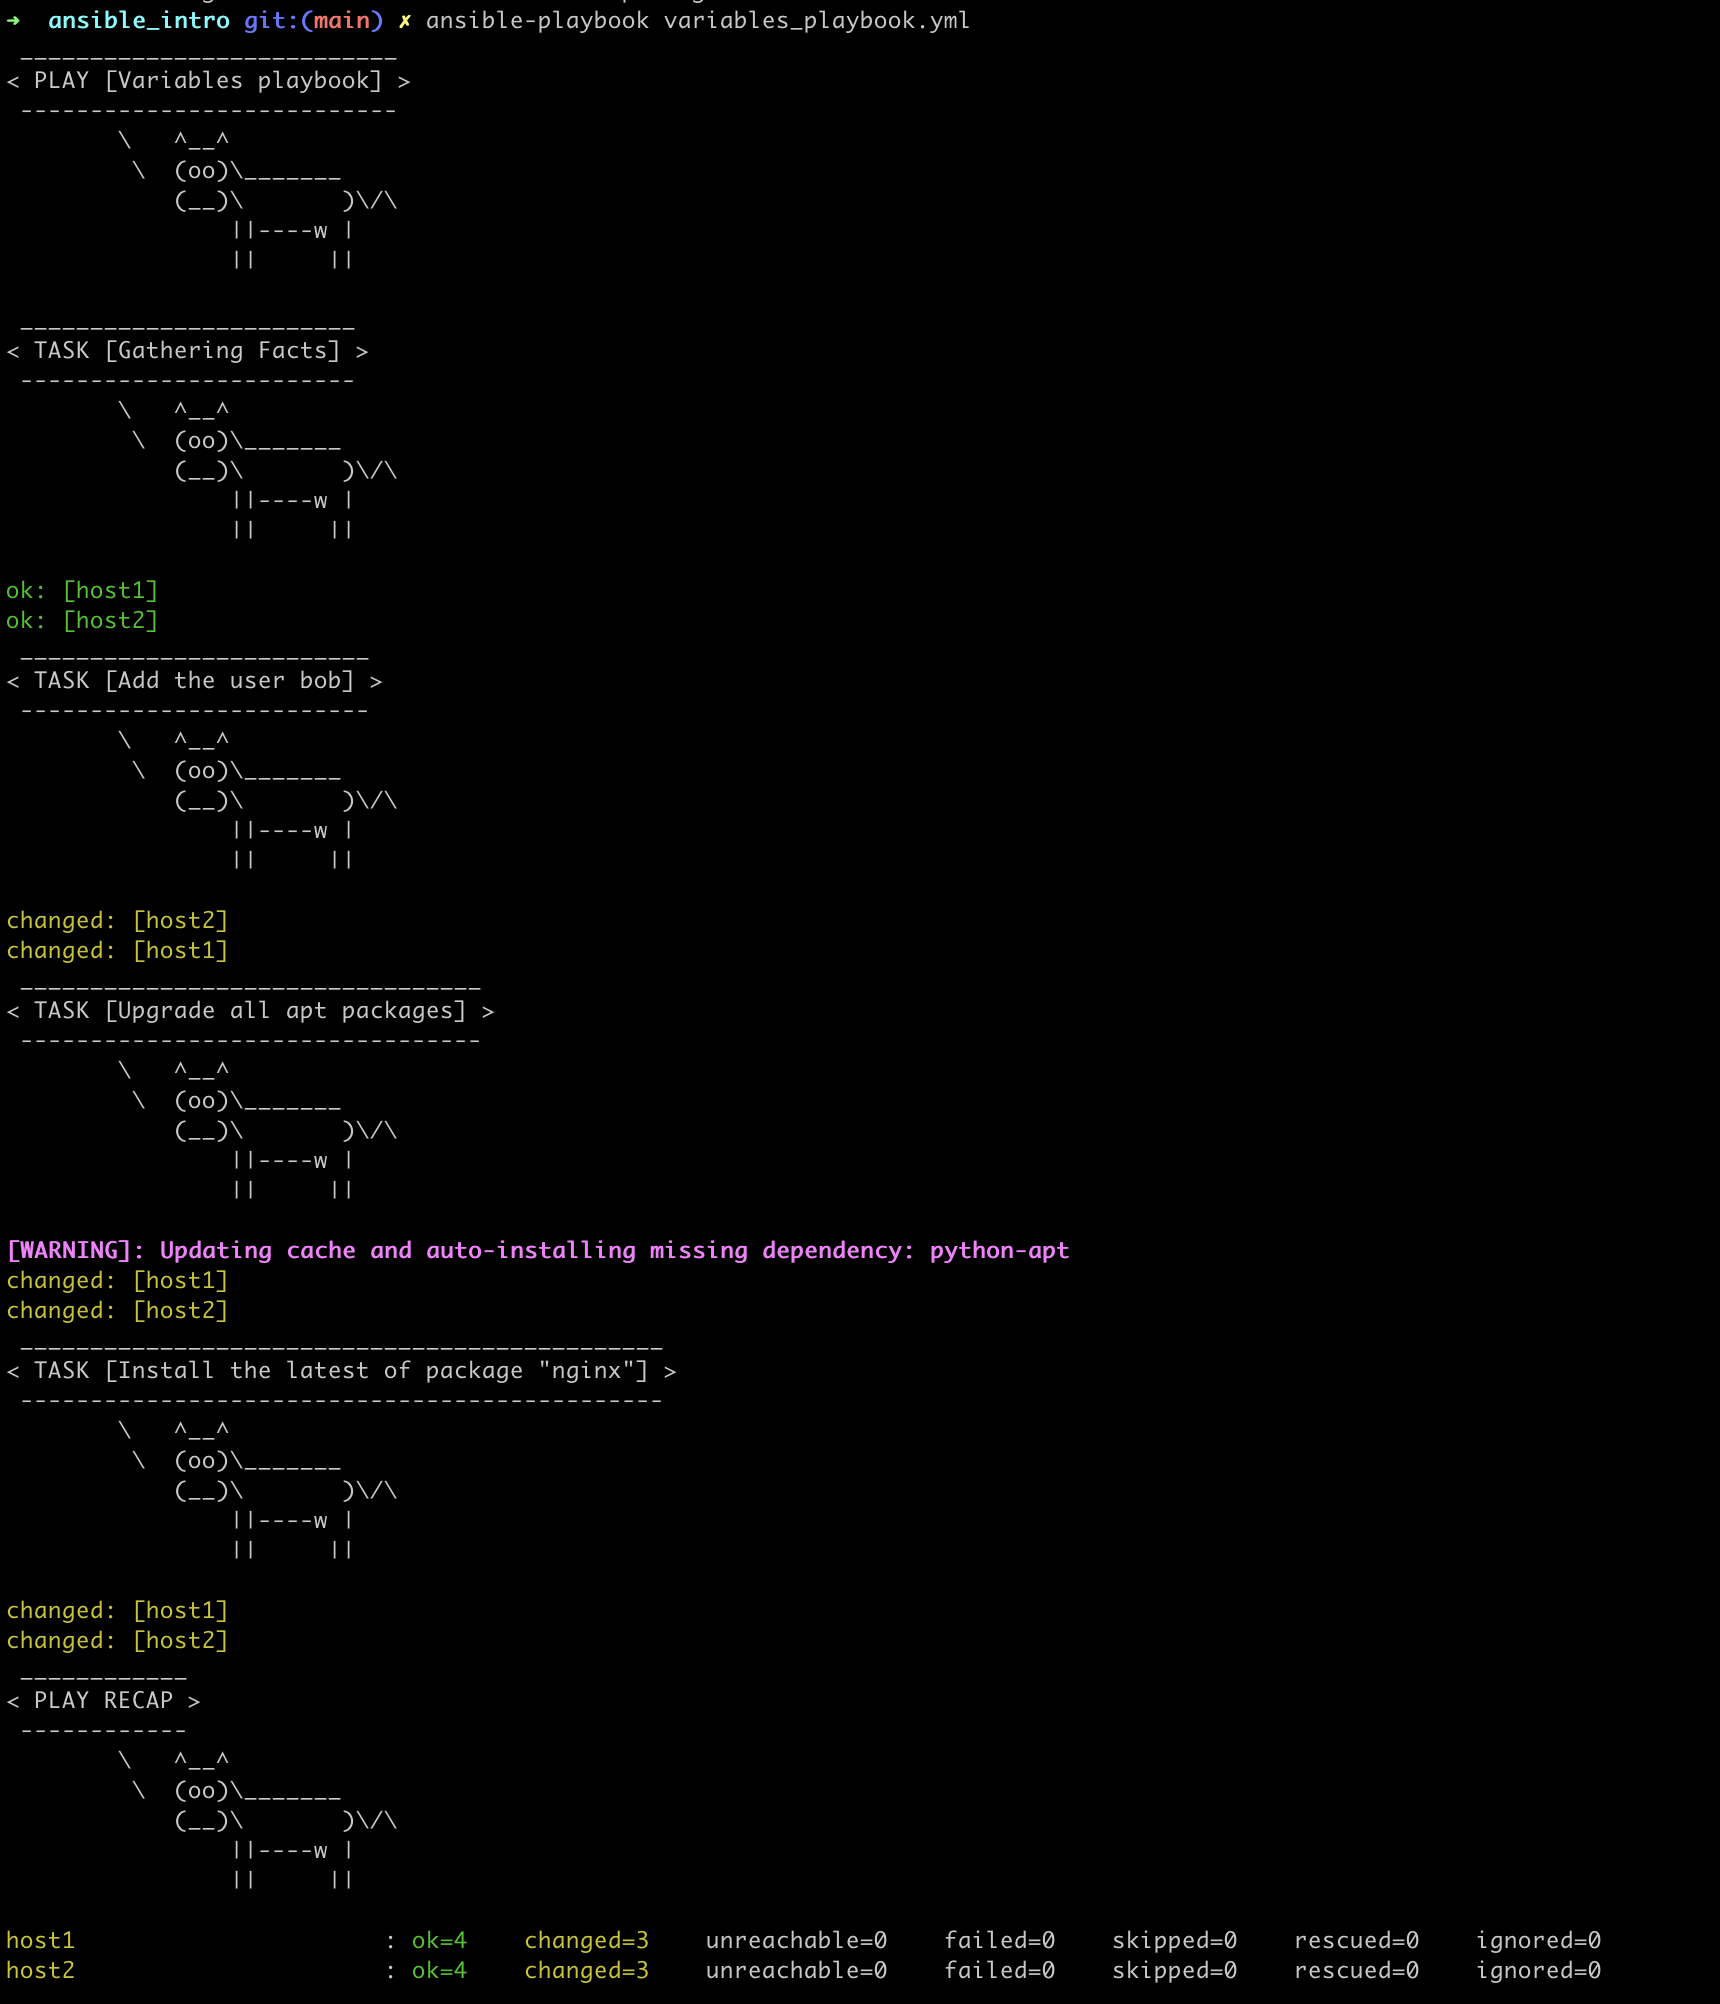
Using Variables in Playbooks
Variables can be defined in Ansible at more than one level and Ansible chooses the variable to use based on variable precedence.
Let’s see how we can use variables at the playbook level.
The most common method is to use a vars block at the beginning of each playbook. After declaring them, we can use them in tasks. Use {{ variable_name }} to reference a variable in a task.
---
- name: Variables playbook
  hosts: all
  vars:
      state: latest
      user: bob
  tasks:
  - name: Add the user {{ user }}
    ansible.builtin.user:
      name: "{{ user }}"
  - name: Upgrade all apt packages
    apt:
      force_apt_get: yes
      upgrade: dist
  - name: Install the {{ state }} of package "nginx"
    apt:
      name: "nginx"
      state: "{{ state }}"
In the above example, we have used the variables user and state. When referencing a variable as another variable’s value, we must add quotes around the value as shown in our example.
During the playbook run below, we see that the variable’s substitution happens successfully.
Take a look at the Using Variables official user guide to learn more about advanced use cases of their usage in Ansible.
Ansible Roles
Ansible roles take your automations to the next level of abstraction.
They are ideal for sharing functionality between different teams, environments, or projects, making your code DRY and enabling streamlined management of your IaC. With roles, you get a standardized structure for bundling related tasks, variables, templates, handlers, and files, and this enhances reusability.
Learn why Roles are useful in Ansible.
Key Points
In this article, we explored Ansible’s basic concepts, features, and functionality while we also explained why it is such a great tool for automation purposes.
Even more, we configured an Ansible demo setup with examples on how to create an inventory, execute ad hoc commands, write and run simple playbooks with variables.
Thank you for reading and I hope you enjoyed this “Intro to Ansible” article as much as I did.